Previous Topic
Next Topic
| Applications |
Previous Topic |
Next Topic |
This Help page discusses the information fields you see on the Application Detail page of the system and provides assistance on how to use the electronic system to complete and submit an application. In this system, the term “application” is used to identify several types of document submittals, including permit applications, permit-by-rule (PBR) notifications and request administrative permit modifications (RAPM). This Help page will not provide guidance or assistance with completing the application and permitting process in general, for example determining if an application is necessary or how to calculate actual emissions. If you require this type of assistance you may view resources contained on the Reference page of this system (including detailed application instructions), you may contact your DO/LAA representative, or consult the Ohio EPA Division of Air Pollution Control website. Confidential assistance is also available for small businesses from Ohio EPA’s Ohio Compliance Assistance and Pollution Prevention (OCAPP) office. The Reference page of this system contains a direct link to the OCAPP website.
The Application Detail page is the electronic depiction of all of the application information that can be found in the hard copy form except basic facility information which is contained in the Facility Profile. Title V applications and PTI/PTIO applications from Title V or "synthetic minor" (a facility with a federally enforceable restriction to avoid a Title V applicability) facilities are required to be submitted through this electronic system; whereas PTI/PTIO applications from a true minor facility may be submitted as an option. For applications eligible to be submitted as a “hard copy” rather than through Air Services, it will be necessary for Ohio EPA staff to enter it electronically upon receipt. If you enter all your applications electronically this will help to expedite the application process.
The only applications that can be viewed by
Ohio EPA are those that have been submitted through Air Services, or
those that were submitted in hard copy form and are
entered electronically by Ohio EPA staff. As you are entering your
application information into the Application Detail
page you can save
your work, via the  button at the bottom of the Application Detail
page,
and return at any time to continue entry without submitting the
application. In order to submit your application it must pass a
validation process, performed by the system, to ensure the minimum
information is included. Whenever you attempt to Validate
your
application, via the
button at the bottom of the Application Detail
page,
and return at any time to continue entry without submitting the
application. In order to submit your application it must pass a
validation process, performed by the system, to ensure the minimum
information is included. Whenever you attempt to Validate
your
application, via the  button at the bottom of the Application Detail
page, you may receive a pop-up box identifying any missing steps that
must be performed in order to submit your application. Please note, the
system only checks that a field has data or information but it cannot
confirm that the data or information is correct. Again, you can save
your work at any point and return to complete more work during any part
of this process. Once you have completed the validation process, you
will be able to Submit
your application, via the
button at the bottom of the Application Detail
page, you may receive a pop-up box identifying any missing steps that
must be performed in order to submit your application. Please note, the
system only checks that a field has data or information but it cannot
confirm that the data or information is correct. Again, you can save
your work at any point and return to complete more work during any part
of this process. Once you have completed the validation process, you
will be able to Submit
your application, via the  button at the bottom
of the Application
Detail page, whenever you are ready.
button at the bottom
of the Application
Detail page, whenever you are ready.
Depending on whether you are viewing an application that has been submitted or you are viewing an application that has yet to be submitted (i.e., an application in the process of being entered), the application may be editable. Once the entire application has been validated and submitted, the application will not be editable, nor will you be able to delete it.
The contents of these application pages will differ depending on the type of application you are working with. The following are the basic steps to creating an application:
Most of these steps are completed in the Application Detail page or through the Application Tree although some are completed in the Facility Profile and the Facility Tree. This Help page will guide you on when you may need to refer to the specific Help pages for the Facility Profile and Facility Tree where you can perform those steps. Use the bookmarks below to view the details of these steps, the specific application types or possible application scenarios.
At any point in the process of entering your application
information,
you can save your work and return to it later without losing the data
entered provided you click at the bottom of the Application Detail
page
after editing. After the first save you perform your application will
appear in the datagrid of In Progress Tasks
in the middle of the Air
Services Home tab. Under Task Description
a hyperlink title, for
example PTI/PTIO
Application, will be available. Click the hyperlinked
title to continue working on the application. You will also be
able to access the last application you worked on
by clicking on the
Application
Detail tab.
If at any point you would like to delete an application you
have not
submitted, you can do so from the Air Services Home
tab. Select the
application you wish to delete by clicking on the radio button next to
the In
Progress Task in the datagrid and click  .
.
The first step in the application process is to ensure the information in your Facility Profile is correct. All applications are linked directly to the current Facility Profile that exists in the database. Your Facility Profile will include, but is not limited to, created emissions units, control equipment, processes, and egress points. As mentioned above, the system’s validation process will let you know when the required fields are or are not completed. You may update and submit Facility Profile changes at any point prior to official submittal of your application or wait and submit the new information with the application.
Check the profile by clicking on the View Facility Profile button located just above the In Progress Tasks area of the Air Services Home tab.

View Facility Profile
This view of the Facility Profile is as it exists with Ohio EPA and is NOT EDITABLE. Therefore, changes cannot be made from this “frozen” screen. If you determine it is necessary to make changes to your Facility Profile after viewing the frozen facility, you will be able to do this in one of two ways:
You will notice a datagrid of In Progress Tasks in the middle of the Air Services Home tab. If Facility Change exists as a Task Type it is through the Facility Profile Change hyperlink (anywhere in that datagrid) where updates to the Facility Profile must occur. Many of the tasks performed in the system (generating an application, generating a FER) will automatically generate a Facility Change task because these tasks are dependent upon the Facility Profile.
If there is no Facility Change as an In Progress Task you can generate such a task by clicking the Facility Profile Change hyperlink at the bottom of the Air Services Home tab under the heading New Tasks.
In either case, the page will refresh and you will be working in the Facility tab in the edit mode. If you need Help with making changes to your Facility Profile please select the Help button on that page and also view the Facility Tree Help page.
A PTI/PTIO application is required for Title V facilities submitting for a permit-to-install (PTI) and non-Title V facilities submitting for a permit-to-install and operate (PTIO). Additional “PTI/PTIO Application Instructions” can be found on the References page which can be accessed from the third-level menu of the Air Services Home tab.
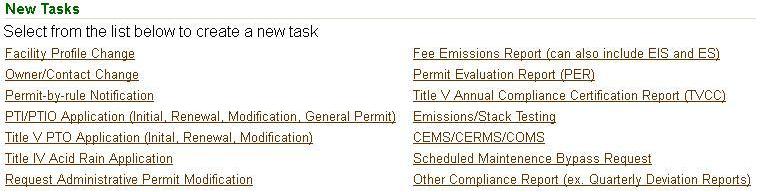
When in the Air Services Home tab there are several hyperlinks at the bottom of the page under the heading New Tasks (see image above). Each hyperlink has a specific function related to the intended topic. Click on PTI/PTIO Permit Application. A pop-up will appear. If a PTI/PTIO application has been submitted for your facility in the past, two radio buttons will appear on the pop-up:
If you do not wish to select either radio button, or if a
PTI/PTIO
application has not been submitted for your facility in the past,
simply click  to open an empty application. If either radio button is
selected, click after completing the necessary fields
to open the
application you wish to correct or the application you wish to use for
the starting point of your next submittal. At any time prior to
clicking , you can click
to open an empty application. If either radio button is
selected, click after completing the necessary fields
to open the
application you wish to correct or the application you wish to use for
the starting point of your next submittal. At any time prior to
clicking , you can click  to abort the process. Once is clicked you will
be taken to the Application
Detail tab where a PTI/PTIO Application
will open in the edit mode.
to abort the process. Once is clicked you will
be taken to the Application
Detail tab where a PTI/PTIO Application
will open in the edit mode.
If the page is not in Edit mode,
click  at the bottom of the page. The
following fields will be identified in the PTI/PTIO application for
editing:
at the bottom of the page. The
following fields will be identified in the PTI/PTIO application for
editing:
 and select the
appropriate Subpart from the picklist. If you need to identify more
than one Subpart, click until you have identified all the
necessary
Subparts. If you find it necessary to make a change to a selected
Subpart, you can select another Subpart from the picklist at any time
or you can delete the entire Subpart by clicking on the box next to the
Subpart, placing a check mark in the box, and clicking
and select the
appropriate Subpart from the picklist. If you need to identify more
than one Subpart, click until you have identified all the
necessary
Subparts. If you find it necessary to make a change to a selected
Subpart, you can select another Subpart from the picklist at any time
or you can delete the entire Subpart by clicking on the box next to the
Subpart, placing a check mark in the box, and clicking  . You must make
these selections or the application will not validate.
. You must make
these selections or the application will not validate. These documents can be added via the  button. When this button is clicked the following pop-up window will
appear with the
ability to add both public and trade secret documents:
button. When this button is clicked the following pop-up window will
appear with the
ability to add both public and trade secret documents:

Enter a Description,
choosing the name of the document
carefully
because this will be the document’s identifier in the system. Select
the Document
type from the picklist and upload the appropriate file. A
Trade Secret File must have a “public” and “secret” file submission.
Upload both versions to the system and use the Trade Secret
Justification box to enter the justification for trade
secret document
submittal. There must be a justification entered to validate the
document. Click  to add the Attachment
or click
at any point to abort
the process of attaching a document. You will return to the PTI/PTIO
Application detail page where you can view your
document(s) in a
datagrid by clicking on the Attachment Type
hyperlink. The Attachment
ID
of the document
will be a hyperlink that generates the Attachment
pop-up where you can
make changes to the Description or
Attachment
Type of the Attachment
or where you can
delete the Attachment
Type
by clicking
. If document uploaded needs replaced
or the Trade
Secret Justification needs edited you must delete the Attachment
and upload it again.
to add the Attachment
or click
at any point to abort
the process of attaching a document. You will return to the PTI/PTIO
Application detail page where you can view your
document(s) in a
datagrid by clicking on the Attachment Type
hyperlink. The Attachment
ID
of the document
will be a hyperlink that generates the Attachment
pop-up where you can
make changes to the Description or
Attachment
Type of the Attachment
or where you can
delete the Attachment
Type
by clicking
. If document uploaded needs replaced
or the Trade
Secret Justification needs edited you must delete the Attachment
and upload it again.
: at any point to save your work. :
to cancel all information you just entered into the fields of PTI/PTIO
Application page. If you want to start over or have made
mistakes, you
can use this button to “reset” the data fields that have been changed
since the last save. Attachments
added to the application are not
affected by the cancel button. These documents are permanent unless
deleted before submission. The button does not delete the application
from the In Progress Tasks
on the Air
Services Home tab.: to reopen the application page in edit
mode to add or delete
information in editable fields. Enter information as needed and or . 
: to reopen the application page in edit
mode to add or delete
information in editable fields. Enter information as needed and or . : :
: :
: :
: : to associate emissions unit(s) at
your facility with this
application. In order to associate an emissions unit with an
application you must first have created the emissions unit in the Facility
Profile. If you need Help with this process refer to the
Help
pages for Facility Tree and the Facility Profile.
After selecting, you
will be taken to the Application
Detail, Emissions
Units page where you
can select the emissions units you want to associate. This is a view of
the Emissions
Units page.
: to associate emissions unit(s) at
your facility with this
application. In order to associate an emissions unit with an
application you must first have created the emissions unit in the Facility
Profile. If you need Help with this process refer to the
Help
pages for Facility Tree and the Facility Profile.
After selecting, you
will be taken to the Application
Detail, Emissions
Units page where you
can select the emissions units you want to associate. This is a view of
the Emissions
Units page.

 when they are
associated with the application and they will also be identified in the
Include
EUs list. Emissions unit(s) located at the facility that
are not associated with the application are denoted by the symbol
when they are
associated with the application and they will also be identified in the
Include
EUs list. Emissions unit(s) located at the facility that
are not associated with the application are denoted by the symbol  and identified in the Excluded
EUs list. The Application Tree is
discussed
in more detail later in this Help page.
and identified in the Excluded
EUs list. The Application Tree is
discussed
in more detail later in this Help page. .
You can also associate
ALL EUs by clicking
.
You can also associate
ALL EUs by clicking  . If you later decide it is necessary to
disassociate an emissions unit from the application you select the EU
ID from the Included
EUs list and perform the same steps with the “remove”
icons. Click
to complete the process or select
to go back to the Application
Detail
page without including or excluding any EUs you may have just moved.
. If you later decide it is necessary to
disassociate an emissions unit from the application you select the EU
ID from the Included
EUs list and perform the same steps with the “remove”
icons. Click
to complete the process or select
to go back to the Application
Detail
page without including or excluding any EUs you may have just moved.  at the top of the
Application Tree.
at
the left of the Application
Detail page. Click
at the top of the
Application Tree.
at
the left of the Application
Detail page. Click  at the bottom of the
page to go to the Emissions
Unit page. Additional information about the Emissions
Unit page can be found under the Application Tree section
of
this Help page.
When using either method you have the option of copying data from
another emissions unit by selecting the emissions unit ID from the Copy
data from EU picklist. This can be useful eliminating the
need to enter
duplicate information if the emissions unit application information is
similar.
at the bottom of the
page to go to the Emissions
Unit page. Additional information about the Emissions
Unit page can be found under the Application Tree section
of
this Help page.
When using either method you have the option of copying data from
another emissions unit by selecting the emissions unit ID from the Copy
data from EU picklist. This can be useful eliminating the
need to enter
duplicate information if the emissions unit application information is
similar. 
The Application Tree contains a list of
emissions unit(s) associated with the facility. The emissions unit(s)
are denoted by the symbol
when they are associated with the application. Emissions unit(s)
located at the facility that are not
associated with the application are denoted by the symbol .
Clicking on an EU symbol will generate the specific Emissions Unit
page
where you
can view specific information about the emissions unit and perform
additional application steps. At any point you can click
at the top of
the Application Tree to return to the Application Detail
page.
Notice that there is a green checkmark ahead of the PTI/PTIO Application header. This indicates that this application has validated successfully and is either ready for submission to the system or has already been submitted successfully.
If any icon in the Application Tree has a  symbol, it has either not been validated or there has been
a Facility
Profile change that needs to be associated with the
application.
symbol, it has either not been validated or there has been
a Facility
Profile change that needs to be associated with the
application.
and click
at the bottom of the Emissions
Unit
page. You have the option of copying data from another emissions unit
by selecting the emissions unit ID from the Copy data from EU
picklist.
and click  at the bottom
of the Emissions
Unit page. .
at the
bottom of
the Emissions
Unit page.
at the bottom of the HAP table. A pop-up will be generated as shown under "Adding Pollutants", below.
at the bottom of the GHG table. A pop-up will be generated as shown under "Adding Pollutants", below. The CO2e
ton per year (tpy) value will be automatically calculated by Air
Services using the global warming potential (GWP) of the selected
pollutant from 40 CFR Part 98, Table A-1
multiplied by the Requested Allowable tpy value associated with the
pollutant in each GHG row of the Greenhouse Gas Pollutants table.
at the bottom
of the Emissions
Unit page. .
at the
bottom of
the Emissions
Unit page.
at the bottom of the HAP table. A pop-up will be generated as shown under "Adding Pollutants", below.
at the bottom of the GHG table. A pop-up will be generated as shown under "Adding Pollutants", below. The CO2e
ton per year (tpy) value will be automatically calculated by Air
Services using the global warming potential (GWP) of the selected
pollutant from 40 CFR Part 98, Table A-1
multiplied by the Requested Allowable tpy value associated with the
pollutant in each GHG row of the Greenhouse Gas Pollutants table.
at the bottom of the appropriate table, you will select the pollutant from a picklist (shown in the above pop-up), enter values and click
automatically populating the datagrid with the information. If
necessary, the values can be changed from the datagrid or the pollutant
can be deleted by selecting the box next to the pollutant and clicking  or
or  depending on which table you are editing.
 button. Click this
button after entering pollutants in the datagrid to automatically
calculate the Requested
Allowable* (ton/year) column for both the Total
Hazardous Air Pollutants (HAPs) and Highest Single HAP
rows based on
the pollutant entries. If you make changes to the pollutant datagrid
after clicking it will be necessary to click the button again to
recalculate the allowables.
button. Click this
button after entering pollutants in the datagrid to automatically
calculate the Requested
Allowable* (ton/year) column for both the Total
Hazardous Air Pollutants (HAPs) and Highest Single HAP
rows based on
the pollutant entries. If you make changes to the pollutant datagrid
after clicking it will be necessary to click the button again to
recalculate the allowables. and
and  (click on blue
arrow) to read details on the information that must be included in the Facility
Profile. Refer to the Facility Tree and Facility Profile
Help
pages for additional information on how to electronically enter this
information.. When this button is clicked the
following pop-up window will appear with the ability to add both public
and trade secret documents:
(click on blue
arrow) to read details on the information that must be included in the Facility
Profile. Refer to the Facility Tree and Facility Profile
Help
pages for additional information on how to electronically enter this
information.. When this button is clicked the
following pop-up window will appear with the ability to add both public
and trade secret documents:
to add the Attachment
or click
at any point to abort the process of attaching a
document. You will return to the PTI/PTIO
Application detail page where you can view your
document(s) in a
datagrid by clicking on the Attachment Type
hyperlink. The Attachment
ID
of the document
will be a hyperlink that generates the Attachment
pop-up where you can
make changes to the Description or
Attachment
Type of the Attachment
or where you can
delete the Attachment
Type
by clicking
. If document uploaded needs replaced
or the Trade
Secret Justification needs edited you must delete the Attachment
and upload it again.  : click this button and the Copy
EU Data page will open where you can
copy all data associated with another emissions unit over to the
emissions unit you are currently viewing. Clicking on an EU ID from the
Available
EUs list and click
. You can reverse the action by performing
the same steps with the “remove” icon. Click
: click this button and the Copy
EU Data page will open where you can
copy all data associated with another emissions unit over to the
emissions unit you are currently viewing. Clicking on an EU ID from the
Available
EUs list and click
. You can reverse the action by performing
the same steps with the “remove” icon. Click  to complete the process.: click this button to exclude the
emission unit you are currently
viewing from the application. Clicking this button will automatically
remove this emissions unit from the application and all data entered
relevant to that emissions unit will be removed. You will return to the
Emissions
Unit page which will allow you to add the emissions unit
back
again if you choose. Once you exclude the emissions unit the symbol
will now be represented as .
to complete the process.: click this button to exclude the
emission unit you are currently
viewing from the application. Clicking this button will automatically
remove this emissions unit from the application and all data entered
relevant to that emissions unit will be removed. You will return to the
Emissions
Unit page which will allow you to add the emissions unit
back
again if you choose. Once you exclude the emissions unit the symbol
will now be represented as .Note that before validating an application, all emissions unit, processes, control equipment and egress points must be created. This is accomplished through the Facility Profile. Please refer to the Help pages for Facility Tree and Facility Profile for further important information concerning these steps.
The next series of headings discuss other application types. To skip this information and go to Validating and Submitting use these bookmarks:
ValidatingThis application is used by Title V facilities that are applying for a Title V Permit-to-Operate (PTO) or requesting revisions to an existing Title V PTO. Additional “Title V PTO Application Instructions” can be found on the References page which can be accessed from the third-level menu of the Air Services Home tab.
When in the Air Services Home tab there are several hyperlinks at the bottom of the page in under the heading New Tasks area (see image above). Each hyperlink has a specific function related to the intended topic. Click on TV Permit Application. A pop-up will appear. If a Title V PTO application has been submitted for your facility in the past, two radio buttons will appear on the pop-up:
to open an empty application. If either radio button is
selected, click after completing the necessary fields
to open the
application you wish to correct or the application you wish to use for
the starting point of your next submittal. At any time prior to
clicking , you can click
to abort the process. Once is clicked you will
be taken takes you to the Application Detail tab
where a Title
V PTO
Application will open in edit mode.
If the page is not in Edit
mode, click
at the bottom of the page. The
following fields will be identified in the Title V PTO application for
editing:

Where:
CO2e = Carbon dioxide equivalent, short tons/year
GHG= Mass emissions of each greenhouse gas listed in Table A-1 of 40 CFR subpart 98, short tons per year entered by the Air Services user.
GWP= Global warming potential for each greenhouse gas from Table A–1 of 40 CFR subpart 98.
. A pop-up
will be generated where
you will enter information. The following fields are identified:
to identify the Requirement
you are not in compliance with, for example Reporting,
and you will
enter a Proposed
Approach to Achieve Compliance. To add more than one
item, click again. You may also delete an entry by
placing a checkmark
in the box next to the entry and clicking  . to identify a Requirement, Limit
(if
applicable) and the Basis
for the Other Compliance
Obligation. To add
more than one item, click again. You may also delete an entry by
placing a checkmark in the box next to the entry and clicking . to
identify a Requirement
and the Proposed
Exemption(s). To add more than
one item, click again. You may also delete an entry by
placing a
checkmark in the box next to the entry and clicking . to identify the Requirement
and the Proposed
Alternative
Emissions Limit(s) and Associated Basis.
To add more than one item,
click again. You may also delete an entry by
placing a checkmark in the
box next to the entry and clicking . to identify the Requirement
and the Proposed
changes to
the existing test method(s) using compliance monitoring, record keeping
or reporting methods. To add more than one item, click again. You
may
also delete an entry by placing a checkmark in the box next to the
entry and clicking . button.
When this button is clicked the following pop-up window
will appear with the ability to add both public and trade secret
documents:
. to identify a Requirement, Limit
(if
applicable) and the Basis
for the Other Compliance
Obligation. To add
more than one item, click again. You may also delete an entry by
placing a checkmark in the box next to the entry and clicking . to
identify a Requirement
and the Proposed
Exemption(s). To add more than
one item, click again. You may also delete an entry by
placing a
checkmark in the box next to the entry and clicking . to identify the Requirement
and the Proposed
Alternative
Emissions Limit(s) and Associated Basis.
To add more than one item,
click again. You may also delete an entry by
placing a checkmark in the
box next to the entry and clicking . to identify the Requirement
and the Proposed
changes to
the existing test method(s) using compliance monitoring, record keeping
or reporting methods. To add more than one item, click again. You
may
also delete an entry by placing a checkmark in the box next to the
entry and clicking . button.
When this button is clicked the following pop-up window
will appear with the ability to add both public and trade secret
documents:
to add the Attachment
or click
at any point to abort
the process of attaching a document. You will return to the PTI/PTIO
Application detail page where you can view your
document(s) in a
datagrid by clicking on the Attachment Type
hyperlink. The Attachment
ID
of the document
will be a hyperlink that generates the Attachment
pop-up where you can
make changes to the Description or
Attachment
Type of the Attachment
or where you can
delete the Attachment
Type
by clicking
. If document uploaded needs replaced
or the Trade
Secret Justification needs edited you must delete the Attachment
and upload it again. : at any point to save your work.:
to cancel all information
you just entered into the fields of the Title V PTO
Application page.
If you want to start over or have made mistakes, you can use this
button to “reset” the data fields that have been changed since the last
save. Attachments
added to the application are not affected by the
cancel button. These documents are permanent unless deleted before
submission. The button does not delete the application from the In
Progress Tasks on the Air Services Home
tab.: to reopen the application page in edit
mode to add or delete
information in editable fields. Enter information as needed and or .
: to reopen the application page in edit
mode to add or delete
information in editable fields. Enter information as needed and or . :::: : when they
are associated with the application and they will also be
identified in the Available
EUs list. Emissions unit(s) located at the
facility that are not associated with the application are denoted by
the symbol
. The Application Tree is discussed in more detail later in
this Help page.
: when they
are associated with the application and they will also be
identified in the Available
EUs list. Emissions unit(s) located at the
facility that are not associated with the application are denoted by
the symbol
. The Application Tree is discussed in more detail later in
this Help page.
. You can also group ALL EUs by
clicking . If you later
decide it is necessary to ungroup an emissions unit from the
application you select the EU ID from the EUs in Group
list and perform
the same steps with the “remove” icons. You will also need to add Group
Requirements to the datagrids at the bottom of the page.
Refer to the
“Facility-Wide
Requirements” bullet under the “How to enter information
into a Title V PTO Application” heading above for Help on this process.
Click to complete the process or select  to go
back to the Application
Detail page without grouping any emissions units.
to go
back to the Application
Detail page without grouping any emissions units. at the top of the Application Tree.: to associate emissions unit(s) at
your facility with this
application. In order to associate an emissions unit with an
application you must first have created the emissions unit in the Facility
Profile. If you need Help with this process refer to the
Help
pages for Facility Tree and Facility Profile.
After selecting, you will
be taken to the Application
Detail, Emissions Units page where you can
select the emissions units you want to associate. Below is a view of
the Emissions
Units page.
at the top of the Application Tree.: to associate emissions unit(s) at
your facility with this
application. In order to associate an emissions unit with an
application you must first have created the emissions unit in the Facility
Profile. If you need Help with this process refer to the
Help
pages for Facility Tree and Facility Profile.
After selecting, you will
be taken to the Application
Detail, Emissions Units page where you can
select the emissions units you want to associate. Below is a view of
the Emissions
Units page.
symbol when
they are
associated with the application and they will also be identified in the
Include EUs list. Emissions unit(s) located at the
facility that are
not associated with the application are denoted by the symbol and
identified in the
Excluded EUs list. The Application Tree is discussed
in more detail later in this Help page.. You can also associate ALL EUs by
clicking . If you
later decide it is necessary to disassociate an emissions unit from the
application you select the EU ID from the Included EUs
list and perform
the same steps with the “remove” icons. Click to
complete the process
or select to go back to the Application Detail
page
without including
or excluding any EUs you may have just moved.
at
the top of the Application Tree. at the left of the Application
Detail page. Click
at the bottom of the
page to go to the Emissions
Unit page. Additional information about the Emissions
Unit page can be found under the Application Tree section
of
this Help page.
The Application Tree contains a list of
emissions unit(s) associated with the facility. The non-insignificant
emissions unit(s) are denoted by the symbol  while
insignificant
emissions unit(s) are denoted by the symbol
while
insignificant
emissions unit(s) are denoted by the symbol  when they are
associated
with the application. Emissions unit(s) located at the facility that
are not associated with the application are denoted by the symbol .
Clicking on an EU symbol will generate the specific Emissions Unit page
where you can view specific information about the emissions unit and
perform additional application steps. At any point you can click
at the
top of the Application Tree to return to the Application Detail
page.
when they are
associated
with the application. Emissions unit(s) located at the facility that
are not associated with the application are denoted by the symbol .
Clicking on an EU symbol will generate the specific Emissions Unit page
where you can view specific information about the emissions unit and
perform additional application steps. At any point you can click
at the
top of the Application Tree to return to the Application Detail
page.
Notice that there is a
symbol next to the application heading.
This means it has either not been validated or there has been a
Facility
Profile change that needs to be associated with the
application.
A green checkmark ahead of the application header indicates that this application has validated successfully and is either ready for submission to the system or has already been submitted successfully.
and click
at the bottom of the Emissions
Unit page. You have the option of
copying data from another emissions unit
by selecting the emissions unit ID from the Copy data from EU
picklist. and click
  at the bottom of the Emissions
Unit page. . at the
bottom of the Emissions
Unit page. or
to
abort the process. You will return to the Emissions Unit
page where
from the datagrid, if necessary, the entries can be changed and you can
click on the Edit
Reason hyperlink and edit as needed.
. A pop-up will be
generated where you will select the pollutant from a picklist, enter a PTE
(ton/year) and PTE Determination
Basis. If this is a trade secret
select the Yes
radio button and enter justification for the trade
secret. Insignificant emissions units will also require entry into a
column Rule
Based Applicable Requirements. Click
automatically
populating the datagrid with the information. You will return to the Emissions
Unit page and from the datagrid, if necessary, the values
can
be changed, trade secret applicability can be edited through the Edit
Reason hyperlink, or the pollutant can be deleted by
selecting the box
next to the pollutant and clicking .
button. Click this button after entering pollutants in the
datagrid to automatically calculate the PTE* (ton/year)
column for both
the HAP-Single
Hazardous Air Pollutants and HAPs-Total Combined
Hazardous Air Pollutants rows based on the pollutant
entries. If you
make changes to the pollutant datagrid after clicking it will be
necessary to click the button again to recalculate the values
allowables.
at the bottom of the Emissions
Unit page. . at the
bottom of the Emissions
Unit page. or
to
abort the process. You will return to the Emissions Unit
page where
from the datagrid, if necessary, the entries can be changed and you can
click on the Edit
Reason hyperlink and edit as needed.
. A pop-up will be
generated where you will select the pollutant from a picklist, enter a PTE
(ton/year) and PTE Determination
Basis. If this is a trade secret
select the Yes
radio button and enter justification for the trade
secret. Insignificant emissions units will also require entry into a
column Rule
Based Applicable Requirements. Click
automatically
populating the datagrid with the information. You will return to the Emissions
Unit page and from the datagrid, if necessary, the values
can
be changed, trade secret applicability can be edited through the Edit
Reason hyperlink, or the pollutant can be deleted by
selecting the box
next to the pollutant and clicking .
button. Click this button after entering pollutants in the
datagrid to automatically calculate the PTE* (ton/year)
column for both
the HAP-Single
Hazardous Air Pollutants and HAPs-Total Combined
Hazardous Air Pollutants rows based on the pollutant
entries. If you
make changes to the pollutant datagrid after clicking it will be
necessary to click the button again to recalculate the values
allowables.Where:
GHG= Mass emissions of each greenhouse gas listed in Table A-1 of 40 CFR subpart 98, short tons/year.
GWP= Global warming potential for each greenhouse gas from Table A–1 of 40 CFR subpart 98.
. When this button is clicked the
following pop-up window will appear with the ability to add both public
and trade secret documents:

to add the Attachment
or click
at any point to abort
the process of attaching a document. You will return to the PTI/PTIO
Application detail page where you can view your
document(s) in a
datagrid by clicking on the Attachment Type
hyperlink. The Attachment
ID
of the document
will be a hyperlink that generates the Attachment
pop-up where you can
make changes to the Description or
Attachment
Type of the Attachment
or where you can
delete the Attachment
Type
by clicking
. If document uploaded needs replaced
or the Trade
Secret Justification needs edited you must delete the Attachment
and upload it again.: click this button and the Copy EU
Data page will open where you can
copy all data associated with another emissions unit over to the
emissions unit you are currently viewing. Clicking on an EU ID from the
Available
EUs list and click .
You can reverse the action by
performing
the same steps with the “remove” icon. Click
to complete the process.: click this button to exclude the
emission unit you are currently
viewing from the application. Selecting this button will automatically
remove this emissions unit from the application and all data entered
relevant to that emissions unit will be removed. You will return to the
Emissions
Unit page which will allow you to add the emissions unit
back
again if you choose. Once you exclude the emissions unit the symbol
will now be represented as . (Non-insignificant
emissions units only): click this button to
request one or more alternative operating scenarios for the relevant
emissions unit. When you click on this you will go to the Alternate
or Multiple
Operating Scenarios page where you will enter the
following
information: to generate a pop-up where you will
complete
the following fields: or
to abort the process.
You will return to the Alternate
or Multiple Operating Scenarios page
where from the datagrid, if necessary, certain entries can be changed.
You can also delete an entry by placing a checkmark in the box next to
the pollutant and clicking
(Non-insignificant
emissions units only): click this button to
request one or more alternative operating scenarios for the relevant
emissions unit. When you click on this you will go to the Alternate
or Multiple
Operating Scenarios page where you will enter the
following
information: to generate a pop-up where you will
complete
the following fields: or
to abort the process.
You will return to the Alternate
or Multiple Operating Scenarios page
where from the datagrid, if necessary, certain entries can be changed.
You can also delete an entry by placing a checkmark in the box next to
the pollutant and clicking  . or
to abort the process.
. or
to abort the process.Note that before validating an application, all emissions unit, processes, control equipment and egress points must be created. This is accomplished through the Facility Profile. Please refer to the Help pages for Facility Tree and Facility Profile for further important information concerning these steps.
The next series of headings discuss other application types. To skip this information and go to Validating and Submitting use these bookmarks:
ValidatingA permit-by-rule (PBR) is an optional PTI or PTIO exemption available for certain types of air pollution source(s). Sources installing and/or operating under a PBR will follow permit requirements established in rule (the Ohio Administrative Code) rather than a traditional paper permit issued to for the source. If you wish to install and/or operate under a PBR you will submit a complete PBR Notification. This includes completing the information on the Application Detail screen and completing a Permit by Rule Notification Supplement Form for the specific PBR and attaching this to the notification. Keep in mind, in order for an emissions unit to be covered under a PBR, it cannot be covered under any other type of permit, except a Title V PTO. Therefore, it may be necessary for Ohio EPA to revoke a previously issued permit as part of this process. You will have an opportunity to view any permits which may need to be revoked (as described below) and to cancel the PBR Notification if you choose.
When in the Air
Services Home tab, click on the hyperlink
labeled
Permit-by-Rule
(PBR) Notification in the New Tasks
area. The pop-up
will appear and you will select the PBR Type
from a picklist. Select
the appropriate PBR
Type and click to continue or
to abort the process.
Once is
clicked you will be taken to the Application Detail
page in edit mode
where you:
.
or by selecting the EU ID on
the Application Tree to the left of the screen. Both of these features
are discussed under the “How to enter information into a PTI/PTIO
application” heading of this Help page. hyperlink at the top of
the Application Tree. You will notice in the
center of the page a Download
PBR forms from here hyperlink. Click this
link, download the appropriate Permit by Rule
Notification Supplement
Form. You will complete this form electronically, save it
to your
computer and upload it as an Attachment
to this notification request.
Attachments are discussed below.
hyperlink at the top of
the Application Tree. You will notice in the
center of the page a Download
PBR forms from here hyperlink. Click this
link, download the appropriate Permit by Rule
Notification Supplement
Form. You will complete this form electronically, save it
to your
computer and upload it as an Attachment
to this notification request.
Attachments are discussed below. , select the Attachment
Type
from the picklist and enter a Description,
choosing the name of the
document carefully because this will be the document’s identifier in
the system. Upload the document and click . You
will return to the PTI/PTIO
Application detail page where you can view your
document(s) in a
datagrid by clicking on the Attachment Type
hyperlink. The Attachment
ID
of the document
will be a hyperlink that generates the Attachment
pop-up where you can
make changes to the Description or
Attachment
Type of the Attachment
or where you can
delete the Attachment
Type
by clicking
. If document uploaded needs replaced
or the Trade
Secret Justification needs edited you must delete the Attachment
and upload it again..
, select the Attachment
Type
from the picklist and enter a Description,
choosing the name of the
document carefully because this will be the document’s identifier in
the system. Upload the document and click . You
will return to the PTI/PTIO
Application detail page where you can view your
document(s) in a
datagrid by clicking on the Attachment Type
hyperlink. The Attachment
ID
of the document
will be a hyperlink that generates the Attachment
pop-up where you can
make changes to the Description or
Attachment
Type of the Attachment
or where you can
delete the Attachment
Type
by clicking
. If document uploaded needs replaced
or the Trade
Secret Justification needs edited you must delete the Attachment
and upload it again..The next series of headings discuss other application types. To skip this information and go to Validating and Submitting use these bookmarks:
ValidatingThis application on the Air Services Home tab will allow you to request a PTI/PTIO Administrative Modification, Title V Administrative Permit Amendment, or a Title V Off-Permit Change. In order to request one of these changes, your facility must have been issued the appropriate permit. This application process is fairly simple and all three types are nearly identical. The PTI/PTIO Administrative Modification will be used as an example.

..
A pop-up will appear where you will
select the Attachment
Type from the picklist and enter a Description,
choosing the name of the document carefully because this will be the
document’s identifier in the system. Upload the document and click . You
will return to the PTI/PTIO
Application detail page where you can view your
document(s) in a
datagrid by clicking on the Attachment Type
hyperlink. The Attachment
ID
of the document
will be a hyperlink that generates the Attachment
pop-up where you can
make changes to the Description or
Attachment
Type of the Attachment
or where you can
delete the Attachment
Type
by clicking
. If document uploaded needs replaced
or the Trade
Secret Justification needs edited you must delete the Attachment
and upload it again. or by selecting the EU ID on the
Application Tree to
the left of the screen. Both of these features are discussed under the
“How to enter information into a PTI/PTIO application” heading of this
Help page.  .
.Validation of the application is the first step in submitting.
Click ![]() at
the bottom of the Application
Detail page. If there are any issues with
the application a pop-up will be generated. Issues with validation are
categorized as either ERRORs, WARNINGs or INFOs. ERRORs must be
resolved before the document can be validated. If you only experience
WARNINGs or INFOs, the validation process will be successful without
the need to click validate again; however, WARNINGs and INFOs may be
viewed and corrected/changed before submission. If changes are made
after validation, it will be necessary to validate again.
at
the bottom of the Application
Detail page. If there are any issues with
the application a pop-up will be generated. Issues with validation are
categorized as either ERRORs, WARNINGs or INFOs. ERRORs must be
resolved before the document can be validated. If you only experience
WARNINGs or INFOs, the validation process will be successful without
the need to click validate again; however, WARNINGs and INFOs may be
viewed and corrected/changed before submission. If changes are made
after validation, it will be necessary to validate again.
To navigate to any ERRORs, WARNINGs or INFOs, click on the brown underlined hyperlink associated with the issue. This will take you to the page where it was detected. The page should open in the edit mode. If it is an error, you will need to correct the error and navigate back to the Application Detail page to validate again or open the validation pop-up using the toolbar at the bottom of your computer screen and move on to the next error message hyperlink until all errors have been corrected. WARNINGs and INFOs may be viewed by following the above procedure. When viewing, you can determine if the information requires a change or if you want to keep the information as originally determined. WARNINGs typically may be more significant issues than ERRORs.
Once the document passes validation, you will see the following validation successful message and a green checkmark at the top of the page.

With the application now validated you are ready to submit it to the Ohio EPA.
Upon completion of successful validation, you will notice the  button.
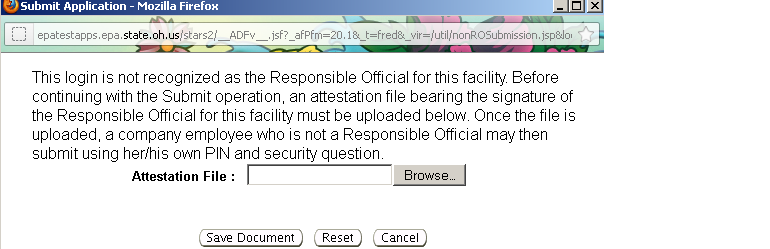
Air Services will allow a company employee that is not a Responsible
Official (RO) or Authorized Representative (AR) to submit permit
applications. Instead of having the RO/AR log in to the eBusiness
Center to electronically PIN the submission, he/she can review items to
be submitted and sign a hard copy attestation. The Air Services
user should then scan their attestation document, which is provided by
Air Services, and upload it as part of the submit process. The Air
Services user will then his/her own PIN and security challenge question
to complete the submission.
button.
Air Services will allow a company employee that is not a Responsible
Official (RO) or Authorized Representative (AR) to submit permit
applications. Instead of having the RO/AR log in to the eBusiness
Center to electronically PIN the submission, he/she can review items to
be submitted and sign a hard copy attestation. The Air Services
user should then scan their attestation document, which is provided by
Air Services, and upload it as part of the submit process. The Air
Services user will then his/her own PIN and security challenge question
to complete the submission.

Now that the application has passed validation the
button will
be available for submission of the application to Ohio EPA. Click . A
pop-up will appear as follows:

Click OK
A pop-up will appear as follows, to confirm whether or not you are the RO/AR:
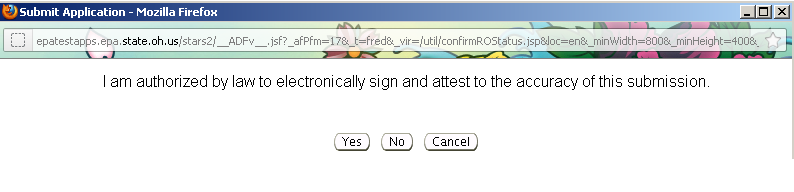
Click  to proceed with the application process or
  to abort the
submittal. If you click , a pop-up will appear as follows where you
will enter
your PIN and click .
to abort the
submittal. If you click , a pop-up will appear as follows where you
will enter
your PIN and click .

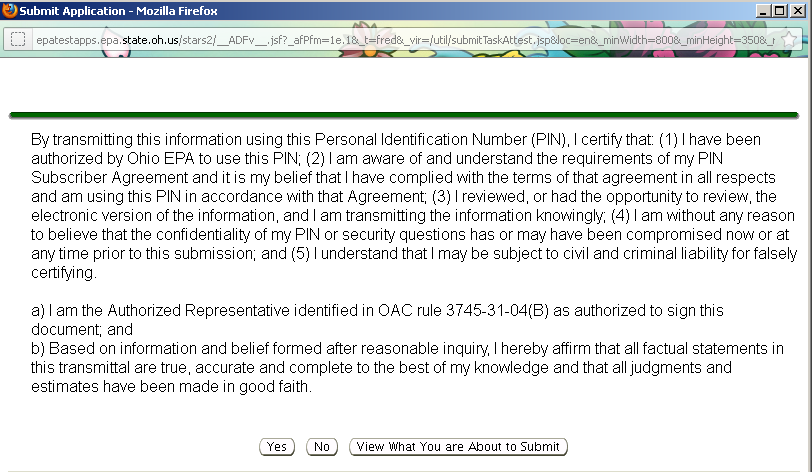
Clicking will generate a pop-up where you will
Answer
the Security
Question you previously established by entering into the
text-box and
clicking .

After clicking , transmission of the application will
occur. As
identified in the text in the above pop-up, clicking the
button will
not stop the application transmission after has
occurred but will close
the pop-up window. You may choose to close the pop-up window or keep it
open. If the pop-up window remains open during the transmittal process
you will see the following pop-up once transmission is complete:

Click  and you will be returned to your Air Services Home
tab where the
application will have disappeared from your In Progress Tasks
list. If
you closed the Security
Question pop-up window before seeing the above
pop-up indicating transmission was successful, you can return to the
Air Services
Home tab where you can confirm successful submission of
the application when it has disappeared from your In Progress
Tasks
list.
and you will be returned to your Air Services Home
tab where the
application will have disappeared from your In Progress Tasks
list. If
you closed the Security
Question pop-up window before seeing the above
pop-up indicating transmission was successful, you can return to the
Air Services
Home tab where you can confirm successful submission of
the application when it has disappeared from your In Progress
Tasks
list.
Note that very large applications can take substantially more
time to
transmit to Ohio EPA. If after a few hours the application still
appears in your In
Progress Tasks list on the Air Services Home
tab you
can open the application and click
again.
Copyright © 1996, 2004, Oracle. All rights reserved.